Lead Acid Battery Charger
by Tony van Roon
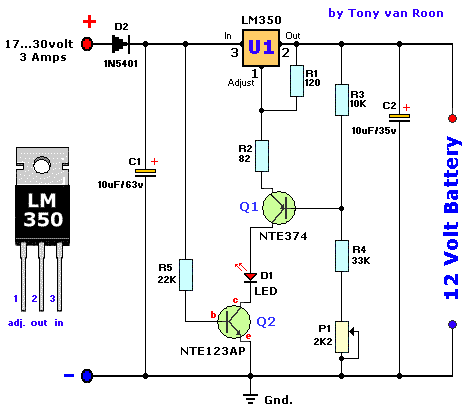
Parts:
R1=120 Ohm  C1=10uF/63V        Q1=NTE374/BD140
R2=82 Ohm   C2=10uF/35V        Q2=NTE123AP/BC547
R3=10K      D1=1N5401/NTE5801  U1=LM350 (On large coolrib!)
R4=33K      D2=LED (Red, 5mm)
R5=22K
P1=2K2
Couple Notes:
Except for use as a normal Batter Charger, this circuit is perfect to 'constant-charge' a 12-Volt Lead-Acid Battery,
like the one in your flight box, and keep it in optimum charged condition. This circuit
is not recommended for GELL-TYPE batteries since it draws to much current.
The above circuit is a precision voltage source, and contains a temperature sensor with a negative temperature
coeficient. Meaning, whenever the surrounding or battery temperature increases the voltage will automatically
decrease. Temperature Coëficient for this circuit is 8mV per °Celcius. A normal transistor (Q1) is used as
a temperature sensor. This Battery Charger is centered around the LM350 integrated,
3-amp, adjustable stabiliser IC. Output voltage can be adjusted with P1 between 13.5 and 14.5 volt. T2 was added to
prevent battery discharge via R1 if no power present. R4 can be adjusted to accommodate P1 adjust. D1 is a large
power-diode, 100V PRV @ 3 amp. Bigger is best but I don't recommend going smaller.
Depending on what type of transistor you use for Q1, the pads on the circuit board may no fit exactly (in case of
the BD140).
Caution: Adjust the voltage of capacitor C1 according to the input voltage. Example, if your input voltage will
be 24 volt, your C1 should be able to carry at least 50V.

Back to Gadgets Menu page
Copyright © Tony van Roon